Parmesan Crusted Chicken


Processed with VSCO with a6 preset

I’m not sure if it’s because I’m a sucker for a good baked chicken recipe or the Marsala mushrooms that are smothering the crunchy, parmesan crusted, perfectly tender chicken breasts, but this is one of my favorite things to make for dinner. I have been making it for years and it never disappoints. It’s really easy too! It will take you about 45 minutes from fridge to table. I like to serve this chicken covered in Marsala mushrooms with fresh steamed asparagus and mashed potatoes. Not to mention this chicken is amazing to cut up and toss on a salad for lunch during the week or to put on sandwiches. You’ll need a few things to make this:
– Chicken breast (boneless skinless)
– Flour (about 2 cups)
– Garlic powder (3tsp)
– Salt (a generous pinch)
– Pepper (3 tsp)
– Parsley flakes (a generous pinch)
– Eggs (2 eggs 2 yolks)
– Parmesan cheese (about 3/4’s cup per chicken breast)
– Olive oil (to brown in the pan)

Processed with VSCO with a6 preset
Start by creating your mixes. Combine the seasoning with the flour in a long flat container and mix well. Then set aside and in a separate container mix your two eggs and two egg yolks, mix well. Lastly pour the parmesan cheese into a third long flat container. Start tenderizing your chicken breasts, you can use a meat tenderizer or as I like to do use my fist. Lightly. It’s a good stress relief after work!
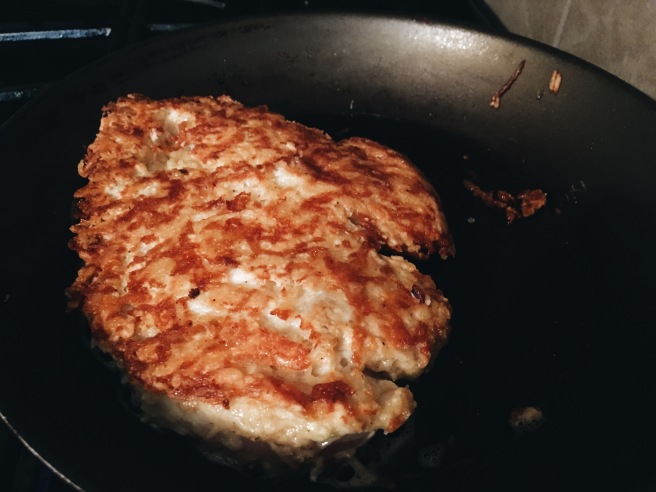
When your chicken is ready to be coated, put the skilled on medium to high heat with a generous amount of olive oil in the pan. Allow this oil to heat up, you are going to sear the sides of the chicken to create the crunchy crust on the chicken. Dip the chicken first in the seasoned flour, then in the egg and lastly in the parmesan cheese. Don’t be afraid to really pile it on here, the cheese needs to cover every spot of the chicken. Then place the coated breast in the preheated pan. Let cook for 3-4 minutes on one side without moving or until the cheese is a beautiful golden color. Be firm as you turn the chicken over as the coating could stick to the pan when you turn it over and repeat on the other side. Place the browned crusted chicken in a greased baking pan.
Continue to do this to all the chicken you would like to prepare, weather you are cooking for a family of 6 or just yourself and the rest of the week! Toss them in the oven at 400 for 40 minutes and you are good to go!

Harvest Breakfast Skillet – It’s Officially Fall!

Processed with VSCO with a6 preset

It’s SEPTEMBER! In my opinion fall has begun. I am welcoming crunchy leaves, sunny days with cool breezes, seasonal baking, pumpkins, and all the delicious food that I now crave this time of year. I love it all. This morning for breakfast I created something I’d like to call a harvest breakfast skillet. It combines fresh apples, sweet potatoes, onion and bacon all topped with a fried egg. When that yoke breaks over the warm, salty-sweet-savory flavor of the breakfast potato combination, you might lose your mind!

Processed with VSCO with a6 preset

Its super easy to prepare, you’ll need:

  • Eggs ( however many you would like!)
  • Sweet potato (1)
  • Red onion (1/4 of a medium sized onion)
  • Honeycrisp apples (1/2 or 1 depending on what you would like)
  • Bacon (about 4-6 strips, diced)

In a large skillet prepare the diced bacon. Once cooked to your satisfaction remove and let cool. In the same pan, add the red onion, diced sweet potatoes, diced honeycrisp apples. Sprinkle with garlic powder, salt and pepper. Leave without stirring to create a crispy texture to the breakfast potatoes mixture. Add in the bacon last to flavor the filing. In a separate skillet, fry or poach your eggs. Now, toss in a bowl and top with the eggs and enjoy!

Life Changing Cinnamons Rolls

Processed with VSCO with a6 preset

It’s been five months since I last shared something delicious with all of you. I am sorry for that but, I haven’t been out of the kitchen. The weather in Kansas City the last few weeks has been pretty stormy, and when its rainy outside there is nothing better than baking something warm and sweet. I knew that made-from-scratch cinnamon rolls would do the trick.

These cinnamon rolls are absolutely heavenly. They are ‘big, fluffy, covered in vanilla icing, melt in your mouth’ kind of good. I haven’t met someone yet that hasn’t enjoyed these bad boys. I sent two batches with my boyfriend, let’s call him Mountain Man, on a recent trip with his buddies. They like to spend a lot of time preparing for hunting season. I figured morning comes early and having breakfast ready to go would be a good idea.

Processed with VSCO with a6 preset

As far as cinnamon rolls go these ones are fairly easy to prepare. You’ll need a few things:

Dough:

  • 3 cups Flour
  • 1 package of active yeast with ½ cup of hot water
  • ½ cup butter or one stick melted
  • ½ cup scaled buttermilk
  • Pinch of Salt
  • 1 egg at room temperature
  • ¼ cup of sugar
  • A few pinches of cinnamon

Filling:

  • Cinnamon sugar mixture (about two cups or so)
  • Brown sugar (about 1 ½ cups or more depending on dough thickness)
  • Lots of melted butter
  • Orange zest (if desired)

Icing:

  • 1 ½ cup Powdered sugar
  • ½ cup Cream cheese
  • ½ cup of your choice of milk (Whole milk, buttermilk or even almond milk)

First combine the hot water and yeast together and set aside. This will activate the yeast. Then while that’s getting ready to go, combine the flour, salt and cinnamon together and mix. In a separate large bowl combine the sugar, butter, egg, and buttermilk until smooth. Add in the yeast that you set aside earlier. Then slowly stir in the flour mixture until the dough is formed. Set aside to let rise for 20-30 minutes. I usually pre-heat my oven and place the dough in a bowl covered with a warm towel to rise. The heat continues to activate the yeast and make the dough double in size. This is how they get so big and fluffy!

Once the dough has doubled, sprinkle some flour on the space you plan to roll out the dough into a large rectangle. But first, sprinkle a little bit of flour over the dough in the bowl and knead for 3 folds. Do not knead too much or the rolls will be tough. This also helps you get all of the dough out of the bottom of the bowl. Then knead the dough twice on the space or countertop that you are going to use. Next you are going to roll the dough with a rolling pin, into a large rectangle shape. The dough should be rolled fairly thin, no more than a quarter inch in thickness. Take your melted butter and spoon it all over the dough, make sure to cover every inch. Then take your cinnamon sugar mix and spoon it all over the surface of the dough. I usually keep a container of sugar and cinnamon pre-mixed in my house. Just in case you need to whip out a few batches of cinnamon rolls or toss it on toast! Lastly with your hands sprinkle brown sugar in small clumps all over the surface of the dough, I also sometimes seasonally I add a little orange zest or finely chopped apples or cherries or pumpkin puree. But sometimes you crave just classic cinnamon rolls. Roll your rectangle up tightly and then slice ever 2 ½ to 3 inches to create your cinnamon rolls. Set the up in a greased pie plate and let them rise for 15 more minutes. Also sometimes the very ends of your sliced roll will be left over, I like to toss them in a small pie plate and sprinkle them with a little extra cinnamon sugar mix and toss them in the oven too! Then let these bake for about 20 minutes at 350.

While the cinnamon rolls are baking heat in on the stove or in the microwave the cream cheese and milk. Add the powdered sugar and whisk quickly until smooth. Depending on how thick you would like your icing you can add more or less powdered sugar. Add a dash of vanilla extract and whisk again. Then you are ready to ice your rolls, hot out of the oven!

P.S. your house will smell amazing and people will notice.

Buttermilk Blueberry Muffins!

Processed with VSCOcam with c1 preset

It takes a lot to cure a case of ‘ The Mondays’ but these amazingly fluffy, buttermilk blueberry muffins, bursting with berries just might do it! I’m not kidding about bursting with berries either, my sister took a bite of a muffin and one popped in her mouth. The look on her face was priceless. I’m a sucker for the perfect muffin. I think the trick is using buttermilk and making a brown sugar- cinnamon crumble to toss on top! Oh, and using tons and tons and tons of fresh blueberries! Make the thick batter, toss on the crumble and bake at 350 for 30 minutes or until they are golden on top.


Heres what you’ll need for the batter:
2 – 2 1/2 cups of fresh blueberries
2 cups all purpose flour, for extra perfect muffins use White Lilly flour it has magic powers.
1 1/3 cup granulated sugar
2 eggs
1/2 cup room temperature butter
2 teaspoons baking powder
1/2 cup buttermilk (if you don’t have buttermilk, add a tablespoon of lemon juice per half cup of milk. Stir and let sit for 5-10 minutes and you’ll have yourself some buttermilk)
Dash of salt

Combine butter sugar and whip until fluffy. Add two eggs and mix. In a separate bowl sift together flour, baking powder and salt. While mixing slowly add half the dry mix. Pour in the buttermilk followed by the second half of dry ingredients. Now fold in the fresh blueberries. Be very careful to not smash all the berries. Fill to the very top the lined muffin tins. Lastly toss on the brown sugar crumble.

What you’ll need for the crumble:
1/2 cup granulated sugar
1/3 cup flour
1/4 cold butter cubed
3 tsb cinnamon
1/3 packed brown sugar
Combine all the ingredients and smash with a fork.

Perfect for a ‘to go’ breakfast all week!

The Ultimate Superfood Egg White Omelette

This has been my ‘go to’ lunch option lately. I never get sick of it. Plus its full of essential nutrients that you need on a daily basis. This has to be the most colorful omelette I have ever made and I can’t wait for you guys to try it. I was inspired by a recent purchase ‘The Superfoods Cookbook’ by Dana Jacobi this book has some great recipes and ‘food for thought’ if you caught my pun.

Lets get to it, What you’ll need:

  • Eggs or Egg Whites
  • Spinach
  • Arugula
  • Sautéed Bella Mushrooms
  • Turkey Pepperoni
  • Shredded Colby Jack Cheese
  • Salsa (to top)

Tip: I like to over cook my egg whites for some reason the crispy outside tastes good in my opinion! Also this is great for lunch, it keeps me full for the rest of the day!

French Toast with Pan Fried Bananas

Sunday’s are my favorite. Today I made french toast topped with pan fried bananas. Drizzle with a little honey and maple syrup and you’re ready to eat! This recipe makes light and fluffy toast with lots of flavor.

What you’ll need:

– Multigrain bread

– Eggs

– Whipping Cream

– Water

– Cinnamon

– Vanilla Extract

– Butter

– Bananas

– Honey

– 100% pure maple syrup

First make your batter.in a flat bowl mix the eggs, cream and vanilla. Next drench your sliced bread on both sides. In a heated pan with butter melted, place the sliced bread in to cook for a few minutes on each side. As for the bananas I used the same pan I cooked the toast in and added a little butter. I put sliced bananas evenly throughout the pan and sprinkled cinnamon over the top while they fried on the bottom.

Now serve the pan fried bananas on top of your toast and drizzle warm maple syrup on top!


Summertime Snackin’

When the temperatures rise, my appetite falls. I find myself snacking throughout the day rather than eating meals. It’s somethin’ about this Texas heat I swear. I thought I would share some of the things that I love to keep around.

The key to healthy snacking is….. Meal prep.

Lets face it when you are looking to snack you aren’t looking to cook. If you can’t grab it ready to go, it’s too much work. I make several snacks in quantity that will last over time! A few of my favorites are:

– Pre-cut fresh fruit! The reason why your fruit is going bad in your fridge or your kids aren’t eating it when you buy it, is because it’s not pre-cut haha. Yes, humans are lazy.

– Caprese bites! Take pearls of fresh mozzarella, cherry or grape mini tomatoes and bits of fresh basil. String em’ all on a tooth pick and you’re ready to go! Also have some balsamic dressing around this pairs beautifully!

– Lemon pepper chicken. Yes, I snack on meat alone. It’s good warm or cold in my opinion. Use olive oil and a little bit of lemon pepper and cook a couple of breasts cut up into small pieces. I like having it ready in the fridge if you feel like tossing a salad together. Hey, it’s the lazy days of summer, use that excuse as long as you can!

Stay cool y’all.

The Sunfloweress

Blueberry Cornbread!

IMG_5561

There are very few things in this world that make you ‘feel like home’ with one bite. Cornbread for me is one of them, but to up the stakes add blueberries! I love love love blueberries. Soft, fluffy warm cornbread with a few blueberries (or a lot) tossed on top, makes for a perfect dessert with honey and ice cream. It can even be served for breakfast with a little butter and a tall glass of milk.

This super easy and yummy blueberry cornbread is made from scratch, my recipe is under ‘pies and desserts’.

-The Sunfloweress

Lets talk about my favorite breakfast food

Breakfast

Eggs.

I love scrambled eggs. In any style really, I like them plain, I like them with cheese, I like them with veggies, I like them with salsa but my all time favorite way to eat scrambled eggs is with ketchup. Yes, ketchup. I have been praised by other ‘egg n’ ketchup’ fans and I have gotten some strange looks from the other side of the table in the morning.

I don’t drown them in the tomato goodness. All you need is a light drizzle and you are ready to eat! It might because there’s a salty and sweet taste going on or it might be a sign that I eat way too many eggs. Try it and tell me what you think!

Here’s a few tips I always remember when making the perfect scrambled eggs.

– Some people add a little bit of milk, really if you whip or scramble the eggs enough you shouldn’t have to!

– Low to medium heat and constantly stir to prevent burnt spots that have sat still for too long.

-Add all your toppings at the end! If you add them in the beginning you will lose some of the flavor.

Enjoy! -The Sunfloweress

Slowly, But Surely!

The first two recipes are up! I have added my Apple Pie recipe to  ‘Pies and Dessert’ and I have also included my recipe for homemade Cinnamon Rolls with Cream Cheese Icing to ‘Breakfast’!

I hope yall are as excited as I am every time I put up a new recipe!

-The Sunfloweress